Taking a screenshot is an important skill for young people and parents to get. This article will show you how you can take a screenshot of the screen or a picture on your computer. Not only are screenshots helpful for displaying computer applications, specific moments, and accessing online resources if you don’t have an internet connection, but they’re important for recording evidence of cyberbullying.
What is a Screenshot?
A screenshot or screen capture is a photo taken by a PC user, using the device in question, to record the visible items displayed on the monitor. The picture is saved as a graphics file. Screenshots can be taken using a variety of programs or using specific keyboard/button shortcuts.
-
Taking Screenshots in Windows Vista 7, 8,10 etc.
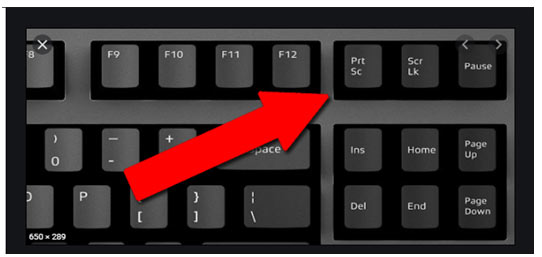
Hit the PrtScn button/ or Print Scrn button, to take a screenshot of the entire screen:
When using Windows, pressing the Print Screen button (located in the top of the keyboard) will take a screenshot of your whole screen. Hitting this button basically duplicates a picture of the display to the clipboard. Where does this go? Well, you need to open Word, Paint, or another image editing app to view, edit, or save the picture.
As an instance, open Word and click on Ctrl and v. This can be a shortcut rather than right-clicking the mouse and choosing paste. If you want to capture only the active window press the Alt and then PrtScn buttons together and paste into your document like previously.
Use the Snipping Tool program to take and edit screenshots:
If you are having trouble finding or using the Print Screen key you may prefer to utilize Snipping Tool. Snipping Tool is a program that is included free of charge with Windows 7, Windows Vista, and a number of Additional Windows products.

It permits you to take screenshots easily by clicking New and then selecting the area that you’d like to screenshot. After that you can edit the screenshot, utilizing highlighter and pen tools. Snipping Tool is merely one of the various tools available to help you in taking screenshots.
Some laptops, in particular, might not possess a PrtScn key. The user manual which came with your device needs to have Instructions on various key combinations that may be used for taking screenshots.
-
Taking screenshots on Mac OS
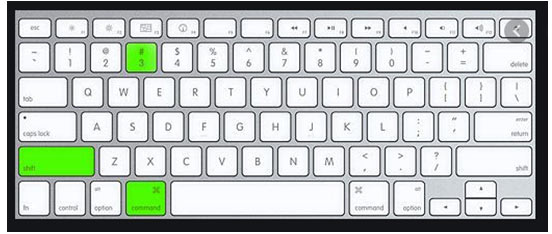
Hit the Command, Shift + 3 keys together to take a screenshot of the entire screen:
When using Mac, pressing on the Command, Shift and 3 buttons together will take a screenshot of your whole screen. This screenshot will be automatically saved to your desktop. Press the Command, 4, and Shift keys together to have a screenshot of a chosen area.
Use the Grab tool to take a screenshot:
An alternative to keyboard shortcuts on Mac is to use the Grab tool. Grab is a program that is included free of charge with Macs. It Permits You to take screenshots easily by clicking Capture and then Choosing the kind of screenshot which you’d like to take. Grab is Only One of The several tools available to help you in taking screenshots.

How to capture part of your screen
If you would like to grab one window, a quick paragraph of text, or even a photograph, you can screenshot a selection of your display using different keyboard shortcuts or even easy-to-use tools that are baked into your operating system.
3- Capturing your screen on Windows 10
To capture just the Foremost or Active Window, press Alt+PrtScn. (If you are on a laptop, you may need to also tap on Fn in precisely the exact same moment.) The picture will get copied to the clipboard for you to paste where you want.
To capture Something Which normally Disappears if you press the Alt key–such as a drop-down menu–press Ctrl+PrtScn instead.
If You Would like to select a Part of your display To catch, hit Windows Key+Shift+S. In Windows 10, this will start the”snipping Bar,” which we will explain below.
Using the Snip & Sketch app
Windows 10 Includes a screen capture Program called Snip & Sketch. Using Snip & Sketch, you also are able to specify areas of the display to capture (an irregular shape, a rectangle which you draw on, a selected window or the whole display ), annotate the display capture, and share your screenshot via email.
If you do not use the Windows Key+Shift+S Keyboard control to launch a tiny version of Snip & Sketch, you can Launching the entire program by clicking Start and typing”Snip & Sketch” in search. Select New to Begin a new snip and select the capture type (rectangular, free type, windowed or full-screen). The picture goes to your clipboard, However, you will also find a pop-up prompt to annotate or share directly in the Snip & Sketch tool.

Using the Snipping Tool in Windows 10
Windows 10 still Gets the older Snipping Tool, also; launching it by typing its name after clicking on your Start button. From that point:
Click Mode to Choose the Kind of display Grab you would like to shoot: a free-form drawing, a rectangle drawing or a complete window. After that, use your mouse to pick the area of your window or screen that you need to capture.
To draw or highlight elements of this Screenshot, click on the pen or highlighter buttons on the menu. You could even set a timer at the utility, which can be useful if you have to give yourself a couple of moments to receive your shot prepared –maybe in the event that you require a screenshot of a context menu, for instance.
As Soon as You’ve obtained your screenshot, you can store it, email it or copy and paste it into a different program.
-
Capturing your screen on mac OS
To capture a particular area of your Display, press Cmd+Shift+4. Your cursor will become a crosshair and you’ll be able to drag around the area you wish to capture.
To capture a Particular window or something Such as the Dock or menu bar, press Cmd+Shift+4 and then hit the space bar. The crosshair will become just a tiny camera and emphasize the window or items you may capture.
To capture what is in your Mac’s Touch Bar, in case Your Mac has one, press Cmd+Shift+6.
What Is the Purpose of a screen capture if you Can not mark this up? Both Windows and Mac have free built-in tools such as cropping, drawing, and editing your screenshots.
-
Annotating and sharing screenshots on Windows
As previously mentioned, Snip & Sketch and the Snipping Tool equally include annotation tools in addition to different options for sharing and saving screenshots. You can also utilize Snip & Sketch to annotate additional images–helpful if you capture a screenshot using a keyboard shortcut or pasted a screenshot from your keyboard.
-
Annotating and sharing screenshots on mac OS
If you use keyboard shortcuts or Screenshot for your screen capture, a thumbnail of your picture will show up in the lower-right corner of the display for a couple of seconds. Click the picture to open mac OS’ annotation and editing programs. Click Done to save your picture to your desktop–or click on the Share button at the upper-right corner to share your own screenshot through Mail, Messages, AirDrop, and much more.
If you do not grab the thumbnail in time, double-click the picture from your desktop to open it in Preview. You will see exactly the same annotation tools and sharing options–also, you will have the ability to store your picture to another place or in a separate format.