You can take a screenshot on pretty much any stage, and taking screenshots in Windows is just the same. It’s an integrated option that works great for basic tasks, but a lot of third-party programs offer more ease of use and features. In this tutorial, we’ll show you a few ways to take a screenshot in Windows 10.
Take Flexible Screenshots with Snipping Tool
The Snipping tool was part of the Windows for an extended time. This tool was initially included in Windows Vista, and never got any new attributes besides few bug fixes.
The Snipping tool may take screenshots of an open window, a rectangular area, a free-form place, or the whole screen. You can annotate your snips with different colored pens or a highlighter, save it as a picture or MHTML file, or email it to a friend.
Snipping Tool in Windows Vista, 7, and 8 has one limitation: it cannot capture screenshots that involve mouse motions. To capture something which involves mouse motion, like pop-up menus and tooltips, you’ll need to use the Print Screen procedure (explained in the coming section of this tutorial).
How to open snipping tool?
It’s no need to install a snipping tool on Windows 10. The snipping tool is your build-in Windows desktop program for users to have a screenshot. It’s enabled automatically once you activate the Windows system. How can we start the snipping tool on Windows 10 and snip on it? Following are three ways of opening this tool:
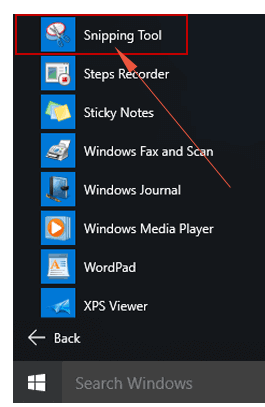
Way 1: Turn it on in Start Menu
Get into Start Menu, Choose All programs, select Windows Accessories, and click on the Snipping Tool.
Way 2: Search on the taskbar
Type snip from the search box on the taskbar, and click on Snipping Tool at the outcome.
Way 3: Turn it on through Run
Press Windows + R in the keyboard, enter snippingtool, and click OK.
Inside the snipping tool
In Windows 10, Snipping Tool includes a new “Delay” option, which will make it possible for you to capture screenshots of pop-up menus and tooltips. Open the Snipping Tool program and click Delay. From the drop-down listing, click the number of seconds you want to wait until your screenshot is taken.

Now pick the sort of snip that you would like to create by clicking on the arrow next to “New”. You may choose from among four kinds of snip:
- Free-form
- Rectangular
- Window
- Full-screen

Unlike a standard snip, the screen won’t immediately fade out. Alternatively, you will have between 1-5 seconds, depending on the delay you selected, to take your screenshots.
You can use this opportunity to start that pop-up menu or tooltip that you need to capture. Once your given time has passed, the display will freeze and fade out so that you may create your snip. If you picked a window or full-screen, it will only catch the snip immediately.
Take Quick Screenshots with Print Screen (PrtScn)
The easiest way to save a copy of whatever is on your computer screen is to just press the “Print Screen” key on your keyboard. It is usually labeled “PrtScn” (or something very similar like “Print Screen”) and can be found in the top row, either one of or close to the Function keys.
Note: A few methods also applicable to Windows 7, 8, or other versions.
On some keyboards (especially laptops) you may have to activate the Print Screen using the Function key (in other words, hold the Function key and then press PrtScn).
Getting fullscreen
To capture your whole screen, tap the Print Screen (sometimes labeled PrtScn) key. Your screenshot won’t be saved as a file, but it’ll be copied to the clipboard. You will want to open an image editing tool (like Microsoft Paint, Photoshop etc.), paste the screenshot from the editor, and save the file from there.
You may also place the PrtScn button to start the Snip & Sketch tool by going to Settings > Ease of accessibility > Keyboard and toggling on Use the “PrtScn button to open screen snipping” under Publish Screen Shortcut.

To Take a Screenshot Without Saving
Press the “PrtScn” key. A screenshot of your screen is now copied to the clipboard. Open your favorite picture editor, word processor, or another app that you need to use the picture in. Choose Edit > Paste to paste the screenshot where you prefer. The dimensions of the image are the same as your desktop resolution.
To Take a Screenshot of Just One Window
Click the title bar of the window you wish to capture. Press “Alt + PrtScn” in the keyboard. A screenshot of your currently active window will be copied to the clipboard, just as in the previous section. Paste it into your favorite image editor or record editor.
Note: On some laptops and other devices, you might have to press the “Alt + Fn + PrtScn” keys instead. Check your laptop’s manual to learn more.
To Take a Screenshot of Section of Your Display
Press “Windows + Shift + S” in the keyboard. Your display will appear grayed out and your mouse cursor will change. Click and drag on your screen to pick the segment of your screen that you want to capture. A screenshot of the display area you selected will be copied to your clipboard.
You can glue it in almost any application by choosing Edit > Paste or pressing Ctrl + V, as you would glue a full-screen shortcut taken together with the Print Screen key.
Windows key + Print Screen to save the screenshot
To capture your whole screen and save the screenshot, tap the Windows key + Print Screen key. Your display will temporarily go dim to indicate that you have only taken a screenshot, and the screenshot will be saved into the Pictures > Screenshots folder.
Windows key + shift-S
You can also use the keyboard shortcut Windows key + shift-S (or the new Display snip button at the Action Center) to catch a screenshot using Snip & Sketch. Your display will dim and you will see Snip & Sketch’s little menu at the top of your screen that will allow you to choose with kind of screenshot that you want to capture.