The CHKDSK is a Windows utility that will check the integrity of your hard disk and may repair various file system errors.
Some users might do not understand what CHKDSK is and how to use it.
CHKDSK (or even chkdsk.exe) is short for “check disc”.
It is a system tool provided in Windows, OS/2, and DOS to check file system integrity of a partition and then fix logical file errors.
CHKDSK will be able to help you mend hard disk errors that happened because of bad sectors, improper or abrupt shutdowns, corrupt software, and meta information corruption.
At any time you have hard disk errors such as you want to format the partition before you may use it brought on by improper shutdown of the device or wrong removal of USB drives, then you may use CHKDSK to locate errors and fix them.
The chkdsk in Windows 8/10
The users of Windows 10/8 might have discovered that Disk Error Checking is a little different from the previous versions of Windows.
In Windows 7 and earlier versions, this is always a good practice since this might help resolve some computer issues and enhance the performance of your Windows computer.
In Windows 8, Microsoft has redesigned chkdsk utility — the instrument for discovering and repairing disk corruption. Back in Windows 8, Microsoft introduced a file system named ReFS, which will not ask for an offline chkdsk to fix corruptions — since it follows a different version for resiliency and thus doesn’t have to operate the conventional chkdsk utility.
The disc is periodically checked for file system errors, bad sectors, lost clusters, etc., through Automatic Maintenance and also you no more have to actually go and run it.
Windows 8 even unlocks the state of this file-system and disc through the Action Center or beneath the Drive properties in File Explorer.
You will be notified about the potential errors.
You may continue to use the pc, while the scanning is completed in the backdrop. When mistakes are present, you might be prompted using a notification to restart your PC.
Steps to run the CHKDSK in Windows 10
Now let us look at the ways of running and fixing the error by CHKDSK in Windows 10.
In order to run the “Check Disk” utility from My Computer, follow this process:
Step 1:
Start your Windows 10.
Step 2:
Double-click on “My Computer” to start it
Step 3:
Pick the drive you need to conduct a test on, For example, F:
Step 4:
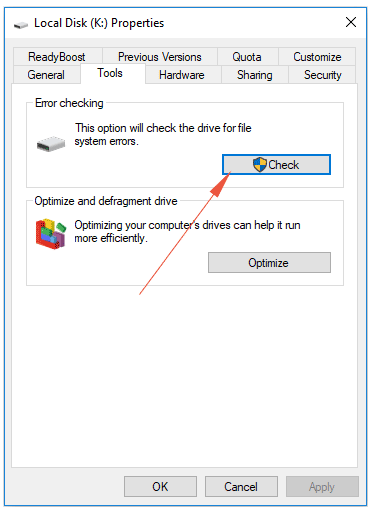
Right-click on the drive and click “Properties”
Step 5:
Proceed to the Tools tab
Step 6:
Select “Check”, in the Error-checking section
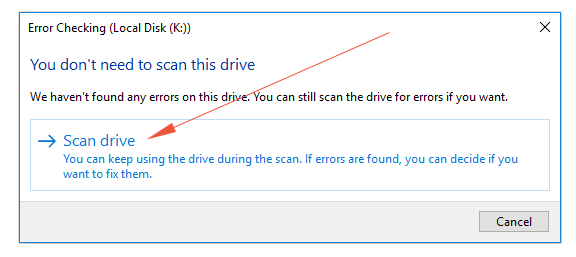
You may see the following message:
“You don’t need to scan this drive. We haven’t found any errors on this drive. You can still scan the drive for errors if you want. Scan Drive”
In that case, click on the “Scan Drive”
If errors are found, you should see the following message:
“Restart your computer to repair file system. You can restart right away or schedule the error fixing on the next restart.”
If no errors are found then Windows will display “No error found” message
Alternative way
You may also go through these steps to run the “Check Disk” for fixing errors.
Step 1:
Open the Disk Management by right-clicking on the Windows 10 start menu.
Step 2:
In Disk Management, you can choose the drive which you would like to check and correct, then right-click it and then select “Properties”.
Step 3:
There you should see the Tools Tab. Click on the “Check” button there as shown below:
Step 4:
If the system finds that there are errors, you’ll be requested to inspect the disk. If no errors are found, you will see a message as shown in the next image.
Click “Scan drive” if you still want to check it for errors.
Running the CHKDSK in the command prompt
You may also choose to check disk by using the command prompt. The process is simple. Open the command prompt by pressing “Windows + R” in the keyboard.
Then type the “cmd” and press enter.
It should open the command prompt.
So, if you want to run “check disk” process on the D:/ drive then type this command:
chkdsk /f C:
You may require the restart the computer.
Like /f, there are other options available.
- /f – This fixes any errors if found.
- /r – Finds and fix any bad sectors on the drive.
You may run these options on FAT32/NTFS partitions:
- /v – Display listing of each file in each directory on the FAT32 partition. On NTFS, it exhibits the cleanup messages.
- /x – force the volume to dismount. Additionally invalidates all available file handles. This should be prevented in Desktop Editions of Windows since it could cause data loss/corruption.