The Crop tool in Photoshop removes or hides whatever portion of the picture you select. It is a vital tool for anybody working with graphics and is helpful to make a focus in your picture and for removing distractions within a picture.
With every version of Photoshop, the Crop tool has enhanced. In this brief guide, I will demonstrate how you can make a basic crop on your picture and a number of the choices you’ve got available to you once you’re cropping.
Photoshop makes it simple to crop your images. This is a highly effective tool for altering the way a photo is framed – you may use the Crop tool to cut away distracting elements in a photograph, or even to “zoom in” to the most interesting details.
It may also change the aspect ratio of a Photograph, or even flip the orientation from portrait to landscape (or even vice-versa).
Steps to Crop a Picture in Photoshop:
- Open the Photoshop program on your Mac computer or PC.

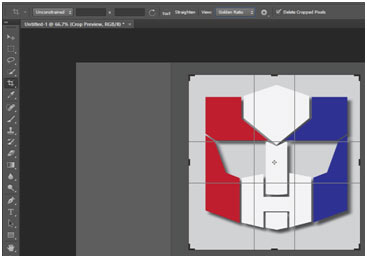
- Click on the Crop tool in the Tools Palette on the left side of the screen — it seems just like two right angles overlapping — or press the keyboard shortcut, C. You need to see the crop box look on your picture.

- If you would like the last picture to have a certain aspect ratio, then it is possible to define which in the Tools Options at the top of the screen (or bottom if you are using Photoshop Elements). It’s possible to select a preset aspect ratio or click on”Clear” (or”No Restriction”) to create the crop box”free form,” which means it is possible to adjust it manually with your mouse.

- Use the crop handles at the corners or sides of the crop box to alter the dimensions of your crop. If you set a particular aspect ratio, then the box will keep that ratio as you make it bigger or smaller. If you cleared the aspect ratio, then you may alter the height and width of this box individually.

- You could even drag the crop box around the picture by clicking and dragging within the crop box.

- To flip the orientation of the crop from portrait to landscape (or vice versa), click the double arrows at the Tools Options menu.
- After the picture is cropped to Your satisfaction, click on the checkmark on top of the screen, or press Enter.

Other Crop Options You May Like to Use:
When you begin to drag with one of the cropping handles, The Rule of Thirds overlay grid appears by default. If you prefer to stick to the Rule of Thirds along with your photography, then this is extremely helpful, but you will find additional Overlay Options available also. Here is the way to find them.
On the Options bar at the top of the display, Click the Set the Overlay Options icon. A dropdown box appears showing you the many overlays that will look when you begin to drag the crop handles. It is possible to cycle through the options by pressing the letter O.

Grid Overlay

Diagonal Overlay

Triangle Overlay

Golden Ratio
Golden Spiral

Finally, on the overlay options, there are three other settings in the menu:

- Always Show Overlay – once you start cropping, it’s visible and stays visible
- Never Show Overlay,
- Auto Show Overlay – it only appears when you’re actually cropping
Freehand Cropping in Photoshop
We have only seen how to perform the most elementary crop i.e. click the tool, the crop borders show up on your picture and you drag the handles. But, you could also simply choose the Crop tool and just drag the area you wish to crop. It does not matter that there’s a cropping border around the picture, you can simply click and drag out then release the mouse. Your new cropping area will appear and if you have to adjust it you can use the handles as before.
How to Cancel A Crop
Stepping back a Bit, if You Would like to Cancel a crop while the cropping border remains on your picture, you may either press Esc on the keyboard or, click the Cancel Crop icon in the Options bar at the top of the display.
If you have already confirmed or committed a Crop, only undo by pressing
- Cmd + Z (Mac) or
- Ctrl + Z (PC)
That’ll take you Back 1 step.