- 1) Free up Hard Disk Space in Windows
- 2) 1. Empty the Recycle Bin
- 3) 2. Uninstall Space-Hungry Applications
- 4) 3. Delete temporary and downloaded files
- 5) 4. Free up space deleting junk files utilizing Storage Sense on Windows 10
- 6) 5. Removal of scrap files using Storage Sense
- 7) 6. Reduce the Amount of Space Used for System Restore
- 8) 7. Nuclear Options
- 9) You may also like to learn:
Free up Hard Disk Space in Windows
Hard disk drives are getting bigger and bigger, but somehow, they always appear to fill. This is a lot more real if you’re using a solid-state drive (SSD), which offers much less hard drive space than traditional mechanical hard drives. If you’re worried about hard disk space, these techniques should assist you to maximize space for important files and programs by removing the unimportant junk cluttering up your hard drive.
1. Empty the Recycle Bin
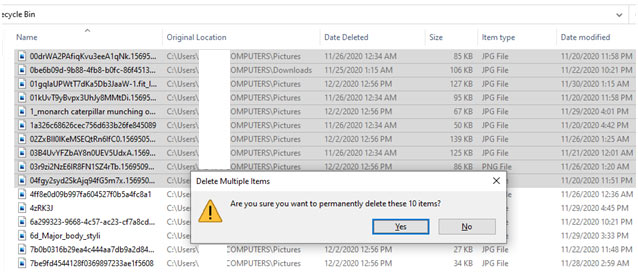
When you delete items, like files and pictures, from your PC, they don’t instantly get erased. Rather, they stay in the Recycle Bin and continue to use up important hard-drive space.
To empty the Recycle Bin, go to your desktop, right-click on the Recycle Bin and click Empty Recycle Bin. You will see a warning pop-up asking if you are certain and want to completely erase your Recycle Bin products. Click Yes to continue.
2. Uninstall Space-Hungry Applications
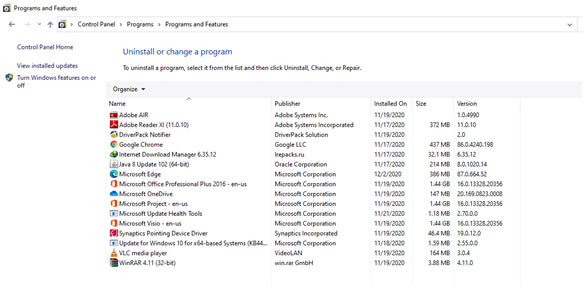
Uninstalling programs will maximize space, but some programs utilize really little space. From the Programs and Features control panel, you can click the Size column to see simply how much area each program installed on your computer is utilizing. The easiest method to get there is to look for “Uninstall programs” in the Start Menu.
If you don’t see this column, click the alternatives button at the top right corner of the list and pick the Information view. Keep in mind that this isn’t always accurate– some programs don’t report the amount of space they utilize. A program might be utilizing a great deal of space but may not have any information in its Size column.
If you’re using Windows 10, you can also open the new PC Settings and go to System à Apps & features
This will let you get rid of either Windows Store apps or regular apps and need to also work on a tablet. You can, of course, still, open the regular Uninstall Programs in the old Control Panel if you want.
3. Delete temporary and downloaded files
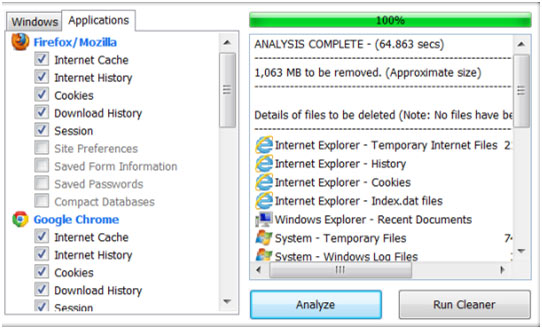
You can erase temporary files without running Disk Cleanup, together with files you downloaded that you may no longer need.
Go to Settings –> System and click on Storage on the left panel. Next, click Temporary files from the list that reveals to you how your storage is being used on the C: drive and examine packages for the kind of temp files you want to jettison prior to clicking the Remove files button to delete them.
4. Free up space deleting junk files utilizing Storage Sense on Windows 10
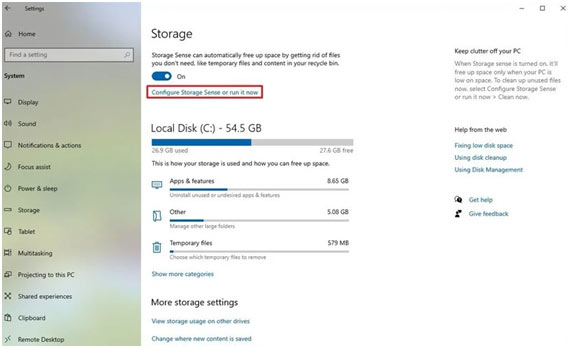
Storage Sense is a function offered on Windows 10, which provides the needed settings to delete scrap files from the system drive as well as secondary drives. Using this function, you can rapidly clean up previous installation files after an upgrade and temporary file to free up space to keep more important information and improve the drive effectiveness.
5. Removal of scrap files using Storage Sense
To free up space using Storage Sense, use these actions:
- Open Settings.
- Click on System.
- Click on Storage.
- Under the “Storage” section, click the Configure Storage Sense or run it now option.
- Under the “Temporary Files” section, check the Erase temporary files that apps aren’t using the option.
- Use the Recycle Bin drop-down menu to specify how to clear already deleted files you do not require.
- Use the Downloads drop-down menu to specify how to clean up files you downloaded from the internet.
- Under the “Locally available cloud content” area, use the drop-down menu to define for how long OneDrive content synced to the device becomes online-only.
- Under the “Free up space now” section, check the Delete previous versions of Windows option (if applicable).
- Click the Clean now button.
After you finish the steps, Storage Sense will run and delete unnecessary files from the gadget to recover more space.
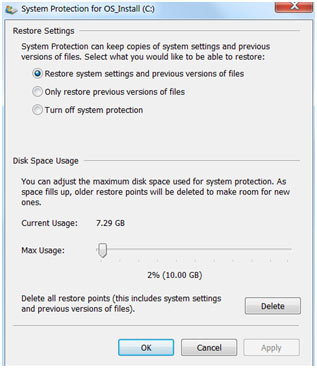
6. Reduce the Amount of Space Used for System Restore
If System Restore is eating up a lot of hard drive space for restore points, you can decrease the amount of hard drive space assigned to System Restore. The trade-off is you will have fewer restore points to restore your system from and fewer previous copies of files to restore. If these features are less important to you than the hard disk space they utilize, proceed, and free a couple of gigabytes by lowering the amount of space System Restore Uses.
7. Nuclear Options
These tricks will definitely conserve some space; however, they will disable essential Windows functions. We do not suggest utilizing any of them, but if you desperately require disk space, they can help:
Disable Hibernation
When you hibernate your system, it saves the contents of its RAM to your hard disk. This enables it to conserve its system state without any power usage– the next time you boot your computer system, you’ll be back where you left of. Windows saves the contents of your RAM in the C: \ hiberfil. sys file. To conserve hard disk space, you can disable hibernate completely, which eliminates the file.
Disable System Restore
If minimizing the amount of space System Restore uses is not good enough for you, you can disable System Restore entirely. You will be out-of-luck if you require to utilize System Restore to restore your system to an earlier state, so be cautioned.