
How to Check Laptop Battery Health in Windows 10
Batteries power our digital gadgets; however, they’re not made to last forever. The battery is one of the most essential elements in any type of laptop, and also if it begins to degrade, even the most effective Windows laptop will certainly have a hard time maintaining good battery life. It might even at some point shut down completely.
It is essential to keep an eye on your laptop battery’s health and wellness for that extremely reason: it can, and also likely will, die at some time, as well as you don’t intend to get stuck changing it in a pinch. And, even if the battery has died, it does not mean you require to buy a new laptop.
The good news is that Windows 10 laptops have a Battery Report feature that can keep you updated with your battery condition. Here is the guide on how to check the battery life.
Option 1
By using Windows PowerShell
- Click the Start menu on your laptop.
- Here search for PowerShell and afterward click on the PowerShell option that shows up.
- Once it shows up, type the following command: powercfg/ batteryreport.
- Press Enter, which will create a report that consists of information on your battery health.
- Search for the folder in your user accounts directory with the name: C: \ Users [YourUsername] to access the report.
- Keep in mind: Instead of searching for PowerShell, you can opt to type “cmd” while pushing the Beginning button.
- Press Ctrl + Shift + Enter to run it in administrator mode.
- While in admin mode, type powercfg/ batteryreport.
- Hit Enter on your keyboard.
- Go to Users \ Your Username folder and search for the battery report. HTML file to access the report.
By following the instructions above creates a report having a lot of information on your laptop, consisting of details concerning your battery health. This report will be HTML data, so all you have to do is double-click it to watch the contents.
Option 2
Run Battery Report
- Carry out a Windows Search for CMD or Command Prompt. You’ll see Command Prompt appear and the search results. Open it. Alternatively, you can find Command Prompt noted under Windows System in the Windows Start menu.

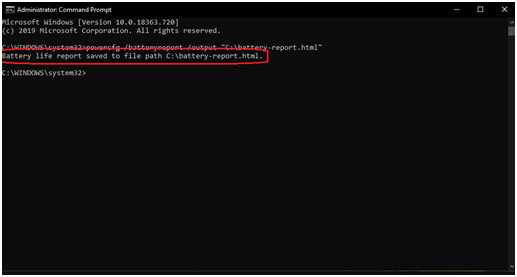
- As soon as opens, you’ll see a command line starting with C: and finishing with the name of your user account. A blinking cursor will certainly show up at the end of this command line. Type powercfg/ batteryreport and press Enter on your keyboard.
- Assuming everything went well, you must see a message in the Command Prompt notifying you that a battery report has been saved to your user folder.
- Navigate to the folder listed in the Command Prompt. This will certainly be your default user folder, which is C: User<yourusername>
- You can access the Battery Report either by using file Explorer to browse to your user folder or by performing a Windows Search for battery report. Note that it might take a few minutes for Windows Search to index the new report and also enable you to look for it, so File Explorer might be much faster.
- Open the battery report as well as have a look! It will be saved as an HTML file, so Windows must instantly open it utilizing an internet browser.

What to see in Battery Report?
The report will lay out the health of your laptop battery, just how well it has been doing, and how much longer it may last. At the top of the Battery Report, you will see basic information concerning your PC, followed by the battery’s specifications.
In the Recent usage section, take note of each time the laptop ran on battery power or was connected to A/C power. Every drain over the last 3 days is tracked in the Battery usage section. You can also get a complete background of the battery’s usage under the Usage history section.