Whether you wish to display your gaming skills or teach a loved one how to do something on an iPhone, screen recordings are simple and effective.
Recording your own iPhone or iPad display is remarkably convenient, whether you are nearing the rewarding conclusion to your favorite Apple Arcade game and you need to record it, or you are trying to walk a loved through how to set up a new program. And it’s also quite simple to do.
It is easier than ever to begin recording your iPhone and other iOS device screen and turn it into a picture. You no longer need to think about mirroring your device onto your notebook to record what is happening on your screen.
Prior to starting, you will want an iPhone screen recorder program.
How to Screen Record on iPhone
Many iPhones possess a native option for screen recording.
Follow these steps if you have one.
Step 1:
Go to Settings, Control Center, Customize Controls, and tap + alongside Screen Recording
Step2:
Swipe up from the bottom edge of the display (if using an iPhone X, then swipe from the top right corner of the display)
Step 3:
Long press the circle record button and then tap to enable audio recording
Step 4:
Once you’ve done that, you can tap Start Recording
Step 5:
If you have previously enabled your mic (or do not want to record sound), simply tap the circle record button (there will be a three-second countdown before your recording starts)
Step 5:
A reddish Recording bar will appear at the top of the display as soon as your recording starts –when you are finished, tap that bar to bring up the Stop screen recording? Option
Step 6:
Tap Stop to stop recording (or hit Cancel to keep recording)
Step 7:
You can find your recording in your Photos app
Note: If you simply have to have a screenshot on iPhone, hold the iPhone Home Button and press the Power button on the side. In case you have an iPhone X or later, hold the Volume up and Lock buttons at exactly the exact same time.
What if you iPhone has no built-in screen recording option? (Second way)
TechSmith Capture is an iOS video capture program that lets you create high quality mobile demos and how-to videos directly from your own phone or tablet computer.
Download the program and follow the advice below to get fantastic results the first time you dive into iOS screen casting.
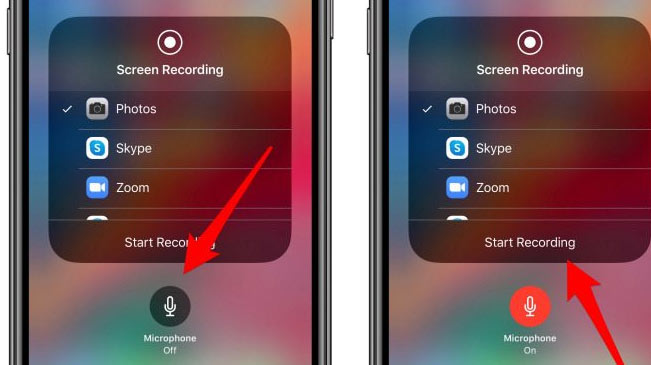
How to Record Sound when Recording Your Own iPhone Screen
Now let us enter the nitty-gritty. To capture ambient sound, such as your voice, through a screen recording, follow these steps:
Step1:
Open the Control Center: On the iPhone X and later or an iPad with iOS 12 or later, or iPad OS, swipe from the upper-right corner of your display. On earlier iPhone versions, swipe from the base of the display.
Step2:
3D touch or press long on the Screen Record icon.
Step3:
Tap the app in which you want your display recording stored.

Step4:
Tap the Microphone on the lower portion of the display to record your own voice.
Step5:
Tap the Start Recording.
A countdown will start out of three, as it reaches one, your iPhone will capture the screen, your voice, and any other ambient sound.
Tap “Stop Recording” to finish the screen recording; the recording will be saved to the location you selected previously.